Configuration menu
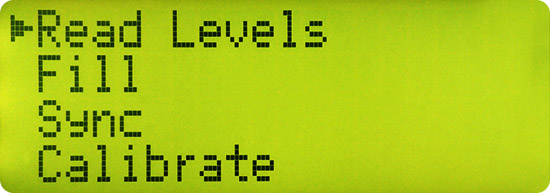
The menu screen is a 20 x 4 character alphanumeric display.
It gives you access to functions such as displaying tank levels, syncing with the online control panel, calibrating, showing the status of the system, or changing connectivity settings.
Standard screen
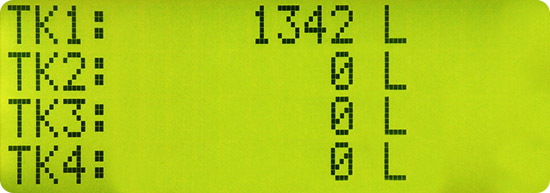
By default the main display will show the standard screen. This indicates the tank levels for up to four tanks.

Tank sensor standard display
In this screen TK1 shows the reading for level sensor 1, TK2 is for level sensor 2 and so on. The screen shows all level sensors as “enabled”. If any level sensor has been disabled on the web control panel, the sensors will be displayed as “disabled” on the main display instead of litres or millimetres.
The default setting is to display readings in litres, which is denoted by the ‘L’ after the number. If a strapping table has not been uploaded to the web interface, the device (controller) will show instead dip height in millimetres, and will be labelled ‘mm’.
If a strapping table has been uploaded the default state is to show litres. To view millimetres, press the RIGHT arrow key at the main screen: the screen will update to show millimetres for 10 seconds, and then revert to showing litres.
If a tank is overfilled above a preset fill level, the sensor line will show a * next to the sensor name (e.g. TK1:* …) and the buzzer will sound. The overfill level of a tank is set by the online control panel.
Menu headings
Read about each of the 6 Menu sections in detail by clicking on them in the navigation bar on the left, or in the table below.
The Menu headings are:
Heading | Description |
|---|---|
Read levels | Displays current levels in all tanks. |
Fill | Displays current levels in all tanks, and does not go to sleep for at least 30 minutes. |
Sync | Start a synchronization with the web server. |
Calibrate | Calibrate sensors 1 to 4 and set safe fill alert levels. |
Status | Displays the controller status information including device name, network, battery level, sensor status, external power source details, last date, time the levels were taken and more. |
Settings | Allows the operator to set device registration code, reboot, network and connectivity settings, and to restore manufacturer default settings. |
Navigation
To move through the menu press the Menu key. To scroll through all MENU items, use the ^ and v arrow keys. The selected menu item is indicated with the “>” character.
The display will read as shown below. To select an item marked by “>” press the ENTER key.

HyDip Tank Gauging device MAIN MENU
If no key is pressed within 30 seconds the controller reverts to the standard screen with tank levels.
If no key is pressed within 60 seconds, and the controller is powered from battery only, the controller returns to the low power sleep mode.
Power and the display
Display on external power (Real Time mode)
If the HyDip is connected to an external power supply (mains or generator), the menu screen will remain on. This is called Real Time mode, and dip readings will be updated every second. If external power is connected and the screen is not lit up, check if the power switch on the side of the controller is switched on.
Display on battery or solar
If there is a power failure and the HyDip controller is only powered by battery or the solar panel, the controller will sleep most of the time to conserve battery power. In this mode the display remains blanked until the controller is manually woken-up by the user.
To wake-up the controller, hold any key on the keypad for at least one second. Unless a key is pressed again within 60 seconds, the controller will return to the low power sleep mode and the display will turn off.
To have a longer viewing time of the display whilst in battery mode, (for example when filling the tank), select Fill from the main menu on the controller. This will keep the display turned on for a continuous 30-minute period after each time you select Fill so the dip level can be monitored on site.
Updated 12 months ago
